Tapestry cushion cover
I hope you’re enjoying the long weekend. I certainly have been. The weather has been gorgeous (far too hot for me!) so I’ve spent most of my time in my craft room. I’ve been working on a project that’s going to be a gift for someone the last couple of days. Today however I have been able to finish another gift off and get that in the lost box ready to be collected tomorrow (that was enough sun for me for one day!) and spent the rest of the day working on this little project for myself.
Do you remember the tapestry I told you about in this blog post.
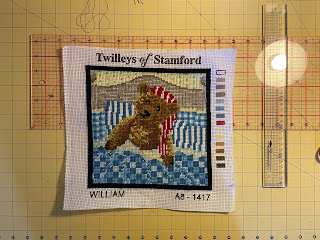
Well I wasn’t sure what to do with it but I saw on YouTube the idea of turning cross stitch projects into cushion covers. I’m not sure if I would think that cross stitch was a bit delicate to be turned into a cushion personally but I was fairly sure that some tapestry would be up to the task. This morning I set to work turning this into a cushion cover.
I wasn’t sure how to do it but I knew I needed to make it bigger to fit the cushion I had.
I decided I’d have a go at what I thought was called log cabin patchwork around the edges. I measured the cushion to start off with and the tapestry that I had to work out how much space I had to fill around the edges.
Once I had done that I calculated how wide the strips would need to be to do a double border around the tapestry and I didn’t have enough red fabric if I did that so I worked out the width of the strips I’d need to do 3 rounds. I would make the inner and outer strips blue (I’ve still got plenty of that sheet left to work with!) and the middle one in the red that I had.
Finally I worked out how I wanted the edges to overlap on each of the 3 rounds.
The finished plan looked a bit like this
 I cut all of the strips out to the sizes that I needed and even cut a couple of sections for the back too. I cheated a bit with these as I was using the fabric from the sheet still - I found an edge that still had a small seam on it and cut the back pieces from that to save me having to make my own seams at the back.
 I started with the inner blue layer adding this to the tapestry. There were a couple of tricky bits with doing this - sewing right at the edge of the tapestry took a few attempts on some sides and also joining the corners. I hadn’t found an easy way to do it at this point so I had a bit of a struggle with every corner. Here’s my first attempt.
 I wasn’t happy that I had pulled the fabric out a bit meaning that you could see the empty tapestry fabric underneath so I went for it again. And again. Take 3 was better and turned out like this.
 Not too bad, it’ll do.
I continued to do the same thing around each side and corner with increasing success but it still was very time consuming and slightly stressful to do.
Blue round was eventually complete though.
I did start to think that if each round was going to take this long then it would either end I taking me a week to finish or it may end up going out of the window before it was done.


 Ta dah! The front is done. All I had to do now was attach the back which should be a piece of cake especially as the edges already have finished seams.
I lay the two back pieces that I’d roughly cut onto the front of the cover that I’d just made as I knew they needed to go right sides together and I wanted to make sure that I got them lined up fairly evenly. I quickly realised that as I’d only rough cut these I needed to pin from the other side so I added a few pins then flipped it to finish pinning from the front.
One quick seam around the edge and this officially became a cushion cover. I only had to unlock a small amount where my final corner didn’t quite meet up properly and one of the sides a bit where I’d managed to catch the flap at the back that would form the opening and got a piece folded over when I was sewing it.
 Once it was all sorted I trimmed the edges a little off the back to make it easier to flip the right way and less boils in the corners.
 And woohoo! I have a completed cushion.


Do you remember the tapestry I told you about in this blog post.

Well I wasn’t sure what to do with it but I saw on YouTube the idea of turning cross stitch projects into cushion covers. I’m not sure if I would think that cross stitch was a bit delicate to be turned into a cushion personally but I was fairly sure that some tapestry would be up to the task. This morning I set to work turning this into a cushion cover.
I wasn’t sure how to do it but I knew I needed to make it bigger to fit the cushion I had.
I decided I’d have a go at what I thought was called log cabin patchwork around the edges. I measured the cushion to start off with and the tapestry that I had to work out how much space I had to fill around the edges.
Once I had done that I calculated how wide the strips would need to be to do a double border around the tapestry and I didn’t have enough red fabric if I did that so I worked out the width of the strips I’d need to do 3 rounds. I would make the inner and outer strips blue (I’ve still got plenty of that sheet left to work with!) and the middle one in the red that I had.
Finally I worked out how I wanted the edges to overlap on each of the 3 rounds.
The finished plan looked a bit like this


I continued to do the same thing around each side and corner with increasing success but it still was very time consuming and slightly stressful to do.
Blue round was eventually complete though.
I did start to think that if each round was going to take this long then it would either end I taking me a week to finish or it may end up going out of the window before it was done.

For the red layer I found a new tactic (I’m not sure if this was because I was on the second round or just because I’d worked it out!) I attached the first strip to the edge of the blue and caught the tapestry fabric in the back too to make it a bit more sturdy. I just left one edge with the end of the strip sticking out a bit ready for the final piece to be attached eventually.

I then could see how this was supposed to work - I attached the next strip across the bottom and used the full straight edge that I had to sew into (the end of the red strip and all of the blue). All I had to do was to leave the extra length of the strip sticking out at the end. This layer came together much quicker!

Now I’d got the hang of it I went onto the final blue layer using the same method.

I lay the two back pieces that I’d roughly cut onto the front of the cover that I’d just made as I knew they needed to go right sides together and I wanted to make sure that I got them lined up fairly evenly. I quickly realised that as I’d only rough cut these I needed to pin from the other side so I added a few pins then flipped it to finish pinning from the front.
One quick seam around the edge and this officially became a cushion cover. I only had to unlock a small amount where my final corner didn’t quite meet up properly and one of the sides a bit where I’d managed to catch the flap at the back that would form the opening and got a piece folded over when I was sewing it.


I think it looks great in my new chair. And is lovely and squidgy and comfy too.

It was definitely worth resurrecting such an old project and going to the effort of getting it finished.
I’ve had a lovely bank holiday weekend. I hope you all have too.


Comments
Post a Comment